Blog Pages

Showing posts with label Photogeekery. Show all posts

Monday, 28 January 2013

Textured photographic art


One of the joys of digital post-processing for me is I get to pretend I can paint by creating images worthy of a canvas! By applying layers of textures to a photo and with much experimentation and tweaking, the photographic image can be manipulated to have more of a "painterly look". It allows me to create mood, change colour tones, manipulate the background to put all the focus on the subject...and it's just plain fun! It's always an experiment as every photo and every texture and every way of blending the two creates a different result. It's a case of fiddling and fine tuning until I'm happy with the result.
Animals were the first thing I started texturing and are immortalised with great elegance by the process.


This image of my boy Oscar is one of my favourites. The textures give him a very soft appearance which complements his nature. The other effect was to subdue the bright colours of the sofa which allows all the attention to be on the beautiful subject.


This photograph was taken by Dilshara of her dog, Murphy. I textured it for her and it printed up beautifully onto canvas.


Another of Dilshara's photos that I textured


Beautiful Ruby is hard to photograph as her eyes are so often covered by hair - a tip for dog's with long hair is to make sure the hair is out of their eyes before you take the shot, othrerwise they have a tendency to look like a toilet brush!

Landscapes are wonderful to texture and I think it gives them a timeless quality.


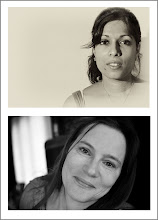
People are much trickier and often the texture is more about creating a border or adding a change in colour tone to the image.


If you are interested in us creating a unique portrait of your pet that will last a lifetime and certainly be a talking point in your home, contact us at mindseyephoto@hotmail.com

LB


Friday, 23 November 2012

My Favourite Lens ... so far ...


Something all you budding photographers might like to read – I’ll come out with it straight away – my favourite lens has to be the 50mm, f/1.8 lens. I say “so far” since I really haven’t tried out every single lens there is and one day I might have a new favourite.


I was motivated to write about this when I was recently asked how a particular photo was taken – it had a very shallow depth of field making one question if the effect had been produced by a programme such as Photoshop instead. 

Though taking photos with an extreme aperture of 1.8 may not produce best quality photos, interesting effects can be made. Here’s a photo of cracked paint taken at f1.8:

Cracked Paint


I find the best use of this lens however is for portraiture. Its crystal clear optics and again its shallow depth of field make for very nice portraits.


Furthermore we can turn this lens into a macro lens by attaching a macro filter onto it. Although not perfect, it’s another interesting use.


This 50mm lens is light weight, fast, has great optics, and is one of the cheapest lenses on the market.


DH

Thursday, 8 March 2012

Memories of Summer


This is the first of our'photogeek-ery' posts, in which we talk more specifically about the stuff we do  and the tools we use.

This photo is a happy accident in some ways. It was taken as an experiment - part of a series where shots were taken from 3 shots underexposed to 3 shots over. This is the 3 shots over exposed image and it is my favourite by far. Once the RAW file was opened I brought out the detail in the eyes, mouth and hair using the adjustment brush in camera raw. With it, you can adjust small areas of the photo in terms of exposure, clarity, etc. This is great where you want to leave most of the image untouched except for some details, as was the case here. Then I pretty much left the rest as shot.

To those interested in the how, I hope that explains it. To those who just like the shot, I hope you love it as much as I do.

LB